
Introduction:
When people think of arid reptiles in their natural habitat, they tend to imagine a lizard dwarfed by swathes of barron sand, baking in the firey heat of the mid-day sun. In reality, this is likely to be far from true: there are only a handful of species adapted for these harsh and unforgiving habitats, and you're unlikely to keep one of these as a pet. Many of our favourite pet reptiles, such as Bearded Dragons, are found in arid environments, but even there you'll find more than miles of sand! Most species inhabit areas of scrub and savannah where a number of plants still thrive including cacti, grasses and other drought- tolerent plants. This guide will show how I built a naturalistic setup for Cairo, my Moroccan Eyed Lizard, a species found mostly in rocky scrubland.
Step 1- Planning and gathering materials
The first step is to get a rough idea what you want to do with your setup, then to gather all the materials you'll require to build it. I usually start this process by researching the native habitat of the species I'm housing, including looking at a number of pictures. This helps me figure out what materials and substrates I can use to get the most natural setup possible. Once you've worked out what species you're housing, the size of your tank/vivarium and a basic plan, you'll want to start buying your materials. Below I have listed the materials I used on this build.
• Damp- proof membrane
• Staples and a staple gun
• Thin pipe/hose
• Heavy duty tape
• Organic, peat-free top soil
• Rocks, both rockery stone and slate
• Cork bark round
• Branches
• ProRep substrate
• A variety of plants (a list is included later in the guide)
Setup 2- electrical equipment
The next thing you'll need to do is to prepare your tank or vivarium by adding the necessary heating and lighting equipment, which you should have found out about when doing research for your new reptile. It is essential to provide your reptiles with heat to allow them to thermoregulate- I usually use a basking bulb on a 12hr on/off cycle, although other options such as ceramic heat emitters or (for smaller setups) heat mats will do an equally good job. These should be controlled by thermostats and monitored by a thermometer. Most reptiles also require UVB lighting to thrive, which you can provide through a UVB tube. These come in various 'strengths' so be sure to check which lighting level your reptile needs. To recap, you will need: a UVB tube and ballast unit, a basking light and fitting (or alternative heat source), a thermostat, a thermometer and the appropriate number of plug- in timers.
LED lighting could also be included to further illuminate the setup if desired, which may also assist plant growth. If you are not using UVB in your setup (although I would highly recommend you do for all species) you should add LEDs for a consistent day/night cycle.
Now with the boring electrical stuff out the way, let's get building!
Step three- waterproofing
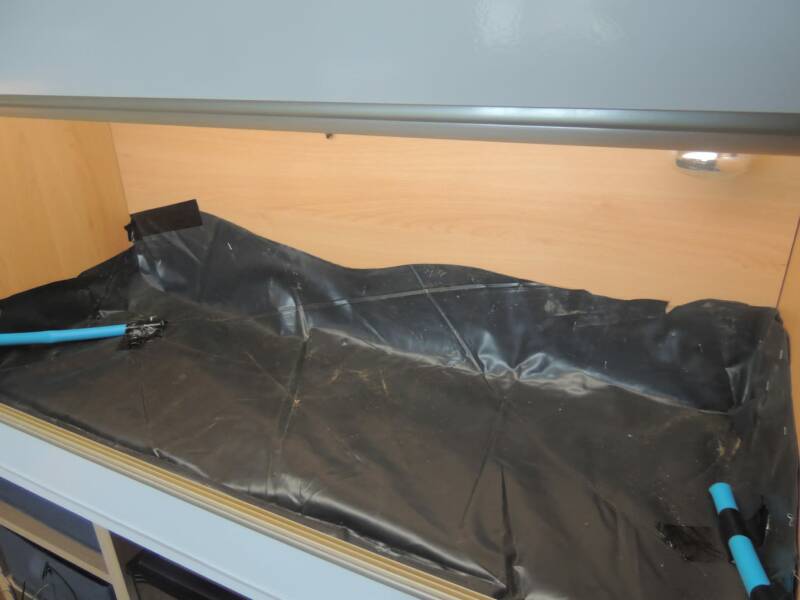
I know what you're thinking, why do we need to waterproof an arid setup? Well all will become apparent soon! Wooden vivariums can become damaged by excessive amounts of moisture, and also leak as the joins are not sealed like those on a glass tank, so we have to waterproof them before we can do anymore. There are 2 simple methods you could use to do this: firstly, using an aquarium silicone and reptile safe varnish, which you can use to coat the entire sides and base of your vivarium. When I built my setup, I needed a quick solution, so opted to use damp- proof membrane, which I cut with scissors and secured in place with a staple gun. You could also use pond liner, or any other safe, similarly waterproof material. With the second method you should try to staple as close to the top level to prevent any moisture going through the small holes created by the staples. For the same reason, avoid stapling the base!
Step four- irrigation

Even plants tolerent of hotter, harsher conditions still need to be watered! In order to give the plants the best shot at survival in the vivarium, I decided to create a damp layer separate from the main substrate layer which my lizard, Cairo, wouldn't be able to get access to. In order to keep this layer moist, I needed to have a system to water the plants directly at their roots. I used 2 short lengths of hose to run from just above where my substrate would come to into the area in which my plant's roots would grow. I simply cut the hose using a pair of garden cutters and secured it in place with heavy duty tape.
Now we have a waterproof base and a method in place to water our plants, we can begin the next step.
Step 5a- Building up the substrate layer

Next, I added in the planting medium: organic, peat-free top soil.
Previous to doing this, I had a rough idea how I wated my setup to look and where the plants would be. The raised areas are where I later added my plants and created my main basking spot. Not only did this top soil provide the perfect substrate to plant into, but it also cut the costs of the more expensive reptile substrate I used later in the build as I required much less. In this vivarium, which is just under 4ft in length and 18 inches deep, I used about 1 1/2 20 litre bags of top soil. This is one of the only images I took throughout the build that really shows how much the levels change across the setup.
Additionally, it is important to compact the soil as tight as possible. This will stop heavy items like rocks sinking into it later, and means there is less likely to be movement in the soil when water is added through the irrigation pipes.
Step 5b- mealworms

I was concerned that with damp soil sat at the base of the setup, it would stagnate and possibly begin to smell and cause other issues. In an attempt to prevent this, I added a number of mealworms, which I hoped would aerate the top soil layer. Before adding them I had compacted the soil, so gave them time to get into the substrate before I continued with the next step.
My hope is that these will thrive in the conditions and overtime, as they become Darkling Beetles, reproduce keeping a steady population in the damp layer.
Step 6- Keeping the damp in

After creating the damp layer, I needed to make certain that Cairo could not access it due to it being more humid than the rest of the setup needed to be. Therefore, I went on to add a second layer of damp- proof membrane over the surface of the top soil, doing my best to follow the contours. I trimmed the excess using a pair of scissors, although a sharp cutting knife would also work brilliantly. Once again I used a staple gun to fix this in place.
To eradicate any chance of Cairo getting between the vivarium wall and the membrane, I used the heavy duty tape to tape the seam all the way around the edge. You could skip the staples and go straight tape if desired, however this would be more difficult and an extra pair of hands would probably come in handy!
Step 7- Furnishing

Now for the biggest- although undoubtedly most enjoyable- setup!
Before committing to anything with your setup, I would recommend placing your largest hardscape elements (your rocks, hides and cork) to get an idea what you want where. After getting things in position, take them all back out again! Maybe take a picture first so you can replace things as they were- I know how frustrating it can be taking ages perfecting something then forgetting what you did!
Now your hardscape is back out of the way and you've worked out where you're wanting your plants, you can cut the slits in the upper layer of the membrane. Using your index and middle fingers, make a hole in the soil with enough room for your plant. Then, remove as much soil from the plants as you can (you may also want to trim extensive root systems) and place them in the holes you have created. To stop Cairo getting into the top soil layer through the slits created, I used the heavy duty tape to tape tightly around the base of the plant. This is far easier to do with single stem plants! I have seen others attempt to close similar gaps using cable ties, although this is something that I found difficult and eventually lost patience with. I used 5 plants in the setup, 4 grasses and a heather. The list is below:
• Carex Pamira
• Festuca Elija Blue
• Arorus Ogon
• Miscanthus Gracillimus
• Heather- variety unknown
With the plants in place, it's time to find that picture you took of your hardscape arrangement and begin to replace it. You can also add in smaller rocks and branches at this stage. If you find it easier, you could wait to add your hardscape until you have added your substrate (see the final step), which is ordinarily what I would do. Due to the inclusion of the plants in the setup, I decided to do things differently, which I have recounted in the order of this guide.
Step 8- topping off
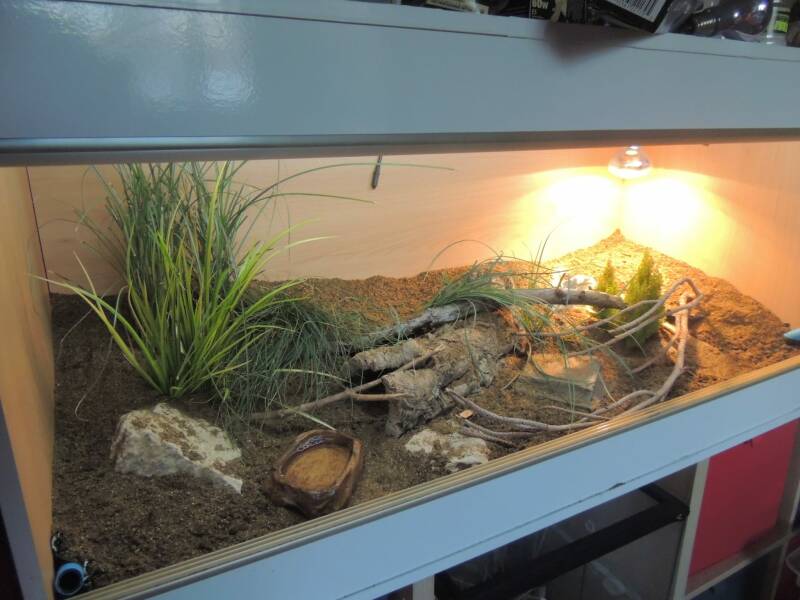
Finally, I added the substrate that we would see and that Cairo would use to burrow and explore. I used my favourite arid substrate, ProRep BioLife Desert, which includes a variety of different textures, colours, materials and sizes giving a far more naturalistic look than any of the other substrates I have used.
Below are images of the finished setup, which I hope will inspire far more naturalistic arid setups and prove that arid reptiles can have, and deserve, far more than some sand, a hide and a rock or two before they can truly have that natural setup. If you've tried your hand at your own arid setup following this guide, I'd love to see! Contact or tag me through Instagram @alis_menagerie, where you'll also be more than welcome to ask any questions you still have when it comes to natural setups!


Disclaimer- not all arid species will be suited to this environment so ensure you do plenty of research using multiple sources to create the perfect setup